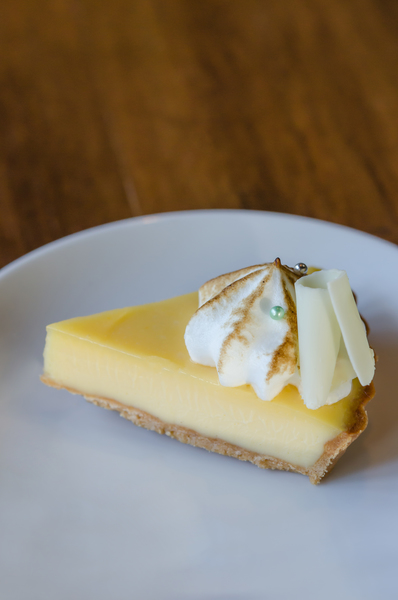
Glorious cheesecake! Each bite starts out firm, almost crystalline, before it transmutes into luxuriant silkiness. That creamy, crumbly collapse is the quintessential New York cheesecake experience, along with the toasty crumb crust contrast against smooth, sweet, ever-so-slightly tart filling.
I craved New York style cheesecake, but not the carbs. There’s sugar everywhere, but that’s just the beginning. Cheesecake filling typically relies on cornstarch for firm, silky texture. The classic cheesecake crusts are graham cracker crumb crust and solid cookie crust — lots of carby flour, in other words.
Not only that, but making traditional cheesecake is fussy, with multiple fail points. I wanted a foolproof recipe for cheesecake.
After a few tries, I worked out some new tricks. I jettisoned a lot of unneeded effort and equipment found in typical recipes, and boosted the quality of the end result. Also, I brought back some historic New York cheesecake features that have seem to have fallen by the wayside over years of Internet adaptations. I believe this is the truest, easiest, and best keto low-carb cheesecake recipe you’ll find anywhere.
I was thrilled at the reception these little keto cheesecakes got when I took a batch to a party the other night. Folks liked it that they weren’t supersweet — that’s a problem with a lot of commercial cheesecakes you come across these days. They said the texture was just right. They even heaped on the best praise of all for any recipe alternative, which is, of course: “Wait, what? These are keto?”
Contents
Small Is Beautiful
These are cheesecake minis. Easy and neat to serve, compared to cutting up a big cheesecake. You know that phenomenon sometimes where it seems like half the cheesecake just sticks to the knife with each slice? What do you with all that globby part? Wipe it off onto napkins between each slice? Scrape it onto the edge of your guest’s plate? Or just forge ahead, affixing a new ragged blob atop each new slice, while meantime it accretes till the knife blade looks like it’s wearing 17 sweaters?
With cheesecake cupcakes you don’t get this problem. At a party, you can arrange them prettily on the serving tray, then just rearrange until the last one is gone.
You can keep these in your refrigerator for days — longer in the freezer — for whenever you’re in the mood for a sweet keto treat. The flavor continues to develop and become more complex over time.
Cheesecake Challenges
Mini cheesecakes are easier to bake right. One of the big challenges with full-size cheesecake is not overbaking. You have to set the outside to cooling while the inside is still molten, or your cheesecake will be dried out. Therefore, you need to learn to detect just the right amount of jiggle, and turn the heat off right then. But don’t turn off the heat too early! It won’t bake enough — and you’ll be serving up goo.
The second challenge for a big cheesecake is keeping the top from cracking.
Cheesecake gets puffy while it bakes. The top becomes a dome, and the sides press outwards against the vertical surface of the cake pan.
As cheesecake cools, the puff subsides fast. Heat escapes through all sides, and the cheesecake compacts. The top goes flat. The sides become less sticky as they cool, and gently they release from the pan wall. If the sides are still sticky and clinging while the cheesecake is shrinking, then everything pulls in a full circle away from the center. Meantime, the center is hotter than the outside, and is pushing outward.
Shrinking and shoving and pulling and clinging — and then the top the cake rips apart. Ouch. Now you know one reason bakers like covering their cheesecakes with toppings.
One way to slow down cooling is to leave the cake in the oven after you turn off the heat. Also, you can partly submerge the cheesecake in a roasting pan full of water while it bakes. A water bath, or “bain-marie,” also keeps the temperature even during baking. But maneuvering a big, open pan of scalding water in your oven is fussy and dangerous.
Compounding the problem, you can’t even use a normal cake pan to make cheesecake. A full recipe is too tall for a regular pan, and besides, you can’t get the cake out without destroying it in the process. You need a special two-part pan called a springform pan. The base plate fits into a ridge in a tall collar. You loosen or tighten the collar with a mighty latch that springs open or snaps shut. Putting together a springform pan is not trivial. The bottom wants to jump up and out as you try to cinch the collar tight around it. Worst of all, it might leak. I’ve known the despair of discovering that the bottom half of my cheesecake has become a sodden mess.
And even when I’ve done all this, my cheesecake still got a big crack on top sometimes.
No Water Bath Needed
These keto cupcake cheesecake minis that you bake in a silicone muffin tray are much more forgiving. They cool evenly and slowly, even without a water bath. The thick silicone provides slow heat dissipation. The proximity of the other muffin wells also stabilizes temperature.
Because they’re so much smaller than a big cheesecake, the center and the edge don’t have a big a temperature difference. They cook much more nearly at the same time.
Lower Heat For Better Texture
Gentle heat and gradual cooling are key to a smooth-textured cheesecake. This keto cheesecake recipe uses a lower heat to bake than in many other recipes I found. High heat causes proteins to coil tightly and squeeze out surrounding moisture, resulting in tough, weeping curds. This is the same phenomenon that you might see when you scramble eggs too hot.
Bake High Up In The Oven
Here’s one trick to replace gentle, even heat of the traditional water bath. Move the oven rack to the top position in the oven. Your mini keto cheesecakes will be farther from the heat source, so they can bake more gently.
Bake On Cooling Rack On Cookie Sheet
The other trick to get gentle, even heat without a water bath is to use a cooling rack. Don’t place the silicone muffin pan directly on a cookie sheet, as you usually would. Instead, put the cupcake or muffin pan on a cooling rack, and then put the rack on the cookie sheet. Presto! You’ve created an insulating air chamber between the bottom of the cupcake pan and hot cookie sheet.
The rack plus tray method is much easier and safer than trying to maneuver with a roasting pan of boiling hot water that sloshes at you when you pull out the oven rack!
Coast To Perfection
Turn off the oven when the low carb cheesecake cupcakes are tender and puffy. Then just let them coast in the hot oven as it cools.
As they cool, the texture goes from a soft, pillowy custard to the dense consistency you’d expect from cheesecake. Should you cut open a hot one to see what it’s like inside, it won’t seem like real cheesecake. No worries! Just wait a while, and you’ll see that it settles into its ultimate form soon enough.
Chill In The Pan
Pop the whole muffin pan of keto cheesecakes in your refrigerator. When they’re cold, you can turn them out of the cupcake pan without the almond meal crust coming apart.
What’s In This Keto Cheesecake Recipe
So much for method. Now for the ingredients that make this the best low-carb keto cheesecake cupcakes recipe.
Keto Low Carb Cheesecake Crust
Easier Crust
I discovered a super easy way to make the crust! You don’t need to make a dough and then divide pieces of it among the cups. You don’t even need to press the crust into the cups. Just spoon in the melted butter and sprinkle on the almond flour. The result is more like a real crumb crust and less like a hard layer of almond marzipan candy under your cheesecake.
I was so excited at having invented this method. Then I learned that Junior’s, the Brooklyn deli founded in 1929, has been sprinkling graham cracker crumbs over butter for decades. True, Junior’s chills its crusts (according to my 1982 New York Cookbook) rather than bake them. But then, graham crackers are already been baked.
Why Whole Almond Flour
Most low-carb cheesecake recipes call for swapping out the carby graham crackers for almond flour. But for some reason, a lot of them specify blanched almond flour — almonds without the dark almond peel. I say the opposite.
Blanched almond flour tastes mild, and the texture is almost creamy. Even after you bake it, the color is tan.
Whole almond flour has the right look, taste, and texture. The speckles of brown almond skin in whole almond flour give you the dark color and deep, nutty flavor of a New York graham-cracker cheesecake crust. It even gives just enough pleasing grit to the crumb.
Look on the ingredient label of your almond flour package, if it’s not specified right in the name of the product. Bob’s Red Mill makes both types of almond flour, unblanched and blanched. The Blue Diamond almond flour I used didn’t specify which type it is on the front, but on the side, under “Ingredients” it said “blanched almonds.”
I experimented with both types of almond flour to make the crust of these keto low carb mini cheesecakes. Whole almond flour was the winner.
The cheesecakes I made with the darker almond flour provided a more dramatic, authentic-seeming contrast of both taste and texture between the crust and filling.
That said, the crust made with blanched almond flour was also delicious. So if that’s the only kind of almond flour you have on hand, don’t let that stop you from making these keto cheesecakes!
Unsweetened Crumb Crust
In a departure from other keto cheesecake recipes I found, my crust recipe here does not include any sweetener. You use just almond flour, butter, and salt.
This is key for two reasons. First, adding sweetener would mask the delicate flavor of the almonds in this particular application.
Second, the crust-to-filling contrast is more dynamic when you don’t sweeten the crust. The trick here is recognizing that the sweeter you make the crust, the sweeter you need to make the filling.
By leaving the crust just short of salty, you can get away with less using sweetener in the filling. That’s what makes it possible for this recipe to use much less sweetener in the ingredients than other keto cheesecake recipes I found. That cuts down the chance of the aftertaste that sugar alternatives can leave behind. Bonus: this recipe is a little cheaper to make!
Low Carb Cheesecake Filling
Sour Cream And Lemon Zest
This low carb cheesecake recipe uses sour cream for a delicately cultured taste, rather than cream. Both are time-honored traditions for New York cheesecake. Additional complex notes come courtesy of the oils in grated lemon zest, following in the tradition of Lindy’s (1921 – 2018), the theater district eatery famous for its cheesecake.
There’s way less lemon juice in this keto cheesecake recipe (compared to others I found online), because the sour cream and lemon zest give you all the tartness as you need. Otherwise, it would be too lemony for plain cheesecake. (I qualify with “plain,” because hey, maybe you’ll want to make lemon cheesecake someday.)
No Need To Powder The Sweetener
Most recipes call for powdered sweetener. Dutifully, I powdered my erythritol and xylitol in a coffee mill on my first couple of runs. As an experiment, I tried using the granulated erythritol and granulated xylitol, straight from the package. To my delight, it didn’t just work — it made the cheesecakes better!
Here’s why. Most of the erythritol and xylitol dissolved. But a few tiny crystals were still detectable in the finished cheesecakes, and they added a big improvement. Granulated erythritol and xylitol help to create that distinctive cheesecake crumbly-to-creamy bite that I love in New York type cheesecake.
Easier and better. And kismet. I love that!
No Need For Stand Mixer Or Handheld Beater
Finally, I cut down on setup and cleanup even more by eliminating the electric mixer. If you mix up the sweetener with the egg first, it dissolves in quite well. Then you can whisk in the rest. Soften the cream cheese a bit more in the microwave, and you’re golden. You don’t want to beat air into this filling anyway; you want it dense rather than airy. The electric mixer introduced the worry of overmixing, anyway. Yay!
Easy Keto Mini Cheesecakes, Classic New York Style
Yield: 12 little cheesecakes.
Before You Begin
Take everything out of the refrigerator and let it come to room temperature. It’s safe to do this hours in advance.
Equipment
- Whisk.
- Bowls for mixing ingredients in.
- 12-cup silicone cupcake tray or silicone muffin pan.
- Note that this recipe is not tested with metal cupcake trays. If you want to give a metal pan a try, you might want to use foil liners.
- Cookie sheet
- Cooling rack
Ingredients
Crust
- 3/4 cup whole almond flour (You can use blanched, but it won’t have the same dark color and toasty flavor, and subtle grit)
- 1 stick (approximately) unsalted butter
- 1/16 teaspoon salt (Skip this if you’re using salted butter)
Filling
- 1 brick cream cheese
- 1/2 cup sour cream
- 2 eggs
- 1/4 teaspoon fresh grated lemon rind (Okay to skip if you don’t have a lemon)
- 1/2 teaspoon fresh lemon juice (Okay to use bottled, but fresh is better!)
- 1 teaspoon vanilla extract
- 1/3 cup erythritol
- 2 tablespoons xylitol
- A tiny pinch of salt (Put a little salt on your palm. You should see what looks like maybe 50 to 100 grains.)
Method
In Essence
Everything bakes on top oven rack position on a cooling rack on a cookie sheet.
- Blind bake crust. Grease the cups. Spoon in melted butter. Sprinkle in almond flour. Bake 10 minutes at 350 F.
- Mix up softened filling ingredients. Spoon into the cups. Bake 30 minutes at 325 F.
- Let cool in oven. Leave them in the pan and chill before you turn them out.
In Detail
First Steps
- Get everything out so it can come to room temperature.
- Move the oven rack to the top slot.
- Take a cooling rack and put it on a cookie sheet. In case the cooling rack is tilted (because the legs of the rack don’t fit in or around the cookie sheet), turn the cooling rack upside down.
- Put the cupcake pan on the cooling rack.
Bake The Crust
- Preheat the oven to 350 F.
- Rub butter liberally all over the insides of the cupcake cups or muffin wells. This should take about a half stick of butter.
- Melt the 4 tablespoons of butter.
- Spoon one teaspoon of butter into each cupcake well. If you have any left over, divide it among the cups. The amounts don’t need to be perfectly equal.
- Stir the salt into the almond flour.
- Sprinkle one tablespoon of the almond flour mixture into the cupcake wells. If you have any left over, divide it among the cups. The amounts don’t need to be perfectly equal.
- Tap or tilt the cupcake pan so that the butter soaks into the almond flour.
- Bake 10 minutes on the top oven rack. (The tray should be on the cooling rack on the cookie sheet.)
- Remove from oven and set aside while you make the filling.
Filling
- Turn down the oven to 325 F.
- Break the eggs into a mixing bowl and whisk them until the yolks and whites are combined, like for scrambled eggs.
- Add the erythritol, xylitol, vanilla, lemon juice rind, lemon juice, and salt.
- Whisk together until well combined.
- Add the sour cream and whisk together.
- Cut up the cream cheese brick into a dozen or so pieces. Microwave on a plate (use low heat if your microwave is adjustable) 20 seconds, or until very soft.
- Add the cream cheese to the mixture. Stir or whisk together. You can use one hand to mix it up, if you like. It doesn’t need to become perfectly smooth and incorporated. It’s fine to leave several pea-size lumps.
- Spoon about two tablespoons of filling into each cupcake cups. If you have any left over, divide it among the cups. Adjust so that the fill levels are pretty much even.
- Bake 30 minutes. (The tray should be on the cooling rack on the cookie sheet.)
After You Bake. (Important!)
- Turn off the oven.
- Leave the cheesecakes in for a couple of hours to gradually cool.
- Chill the entire cupcake pan — still full of cheesecakes — for at least two hours, or overnight if you wish. Do not attempt to remove the cheesecakes from the tray before you chill them!
- Loosen the cheesecakes from the tray by running a dull knife around them. (Don’t slice into your silicone tray!)
- Cover the top of the cupcake pan with a cooling rack.
- Hold the rack against the rack and quickly invert them, so that the cupcake pan is upside down atop the rack.
- Carefully press the bottom of each cup so that the cheesecakes fall out onto the rack. Watch that you don’t dent the cheesecakes as you press.
- Remove the cupcake pan. If any bits of crust remain in the bottoms of the cupcake cups, you can pick them out and press them into any spots that you’d like to patch up.
- Turn the cupcakes over before the cooling rack wires dent the tops.
- Your cheesecake cupcakes are ready! Serve as they are, or with a topping, like berries, chocolate sauce, or sour cream.
